Materials layers and Mask
Creating Materials from scratch
Base Color
Starting Point
Modo has an incredibly powerful and open render engine. Once you understand the science behind materials, modo gives you the tools to recreate them and make them even better. In this page we will slowly build up a material using different layer types and effects. For this image I used the hdri Black Studio 01, found in our presets.
Adding a Layer
- Go to your shader tree and click on the button that says add layer
- In the menu that pops up go under Processing
- Add a constant layer to your scene
- A constant just means a constant color. As in that's all it does.
- Very simple way to color a whole scene, for those more abstract renderings.
- Change the color to a blue
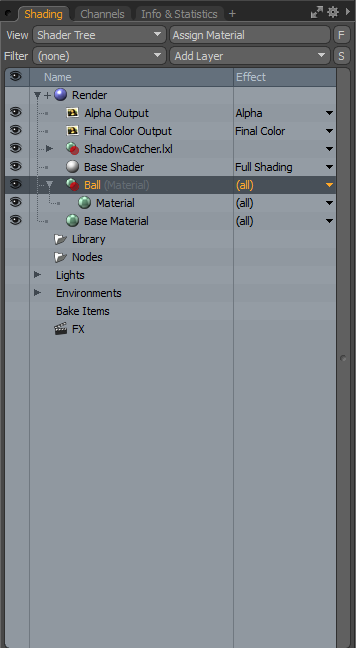
- Remember to place the new constant layer inside of your Ball Material
- Just like that, you have a blue ball.
Adding a Layer
Constant Layer Properties
Make sure it is in the right place
Result
Changing its Effect
If you look at our Constant layer in the Shader Tree, you can see that under effect it says Diffuse. This means that the constant color blue is making the color of our sphere blue. What if we want that constant blue to effect other aspects of our material, not it's color.
- Click drop down menu next to our Constant layer under Effect column, under basic Channels, select Specular Color
- Select our ball Material and change the diffuse to a darker grey
- Under roughness, change to 60%
Adding a Gradient
This might seem simple but we already uncovered some very powerful workflows. We learned that we can use many different types layers to control every attribute in our scene. Let's add some more dynamic maps to make our sphere look even better. What I want to do is add a material that changes color depending on the angle. This is the same property that makes those color changing paints work. It is called Incidence, which basically means, the angle of the polygon face relative to the camera. In fact we will make that right now.
- Add a Gradient layer in the top of our ball material
- Click on Edit Gradient
- Middle Click the Gradient at the 100 percent mark to add another point
- Select the point you made and change the color
- Select the point at 0% and change the color
This might seem quite subtle for so much work but you have to think of it as opening opportunities. In this example, it is being used for simple coloring but you now have control over how the angle of view effects any property of your material. Not only in changing the color but also the intensity, the reflection, any property. What if I wanted to add another layer of texturing, maybe something like a diamond pattern.
Modo Enhanced Materials
Click on the modo help link. Look at all the glorious options we have. These are called enhanced Modo materials and I love them. They are procedually generated, which means you can render any size and the material will still look crisp. They give you options to customize them and they can get you very close to the real thing. First lets add a a lattice 1 enhanced modo layer
Adding a Lattice
- In your Shader Tree select Add Layer
- Go to Enhanced Modo Texture
- Go to tiles
- Lattice 1
- Go to tiles
- Select the new Lattice Layer
- Selects it Texture Locator tab
- Under Transform rotate the locater 90 degrees in Z
- Under Projection Type Change to Spherical
- Selects it Texture Locator tab
Even though we have a cool looking Lattice Texture, we have lost all the work that we did for our colors and angles. All the other layers are hidden under our new Lattice Layer. We can change how a layer effects the layers under it.
Changing the Layer Blend mode
- Select your newly created Lattice layer, go to it's Texture Layer Tab,
- Click on Blend Model
- Change from Normal to Difference
Now our lattice texture is working like a photoshop layer effect. Its the same logic, you have a top layer and you can control how it effects the layers underneath it. Now lets make the lattice into a bump map.
Making it BUMP!
Start playing techno music, it's about to get bumpy.
- Change the blend mode back to Normal
- Make the Lattice Layer effect into a Bump Map
- Effects
- Surface Shading
- Bump
- Surface Shading
- Effects
- Go to Texture Layer properties tab
- Invert the map
- Change the Lattice Thickness to 3
Not enough BUMP
Wow, I see you like to take it to 11, I do as well. Lets change the Effect from bump into a displacement map
A displacement map actually puts real mesh data into our scene based on a map. This makes the end result feel more real but will cost a lot of processing power.
Much Like photoshop layers, you can build layers up with multiple textures. Remember to experiment with blend modes and layer opacity.
Using Masks to mix and match
- Modo mask work by grouping materials together and applying a mask for that group
- You can use any type of map and under effects you can find group mask under Shader Control > Group Mask
- For my example I will add a new material and make it look like copper.
- Remember to add 5mm to displacement distnca
- Now Duplicate our Lattice Layer
- Change the name of this layer to Lattice Mask
- Select the Copper Material and the Lattice Layer and Group them (Ctrl+G)
- Change the Lattice Mask effect to Group Mask
- Effect > Shader Control > Group Mask
- Place that group on the top of the older layers.
Layer Structure
Pay close attention how I structured the Layers. I have my Material Poly Set called Ball, its first layer is a group, inside that group is a group mask and the copper material. My mask is working like any other mask in photoshop. I am using the white of the Lattice to reveal the purple shader we made earlier. So now we know the basics of our shader tree. On this short little project you learned more about structure than replicating materials. We have made abstract materials but we uncovered some very powerful workflows.
Remember to stay curious, you saw many different types of maps, ways they interact with each other. Move things around and experiment. When I wrote this article I got lost in mixing and matching materials with mask and preset shaders, look what happened.
Learn from the PRESETS
When I was learning how shaders worked I would add one to my preset and look at it's structure
For example, for the textures above, I used a preset Fur shader (Notice the little lint in the corners) called Knitted, looked at what I liked, change settings around and discarded what I didn't like.